Tuesday, 17 February 2015

Tutorial Tuesday - Maze Book

This week we are making a cute little maze book. These mini books are great for recording events, giving as gifts or if you are looking for a quick project.


You will need:
Bone folder (& score board if you have one)
12"x 12" card (or you can use a patterned paper)
Craft Knife, Ruler & Cutting Mat
3” x 6 ½” Card (for covers)

Optional
Ribbon (to tie book closed)

Start by scoring your 12x12 card at 3”, 6” and 9”. The rotate it 90 and score again at 3”, 6” and 9”.
Then accordion fold your paper on all the score lines. You should now have a piece of 12x12 paper divided into 16 sections.


Take your craft knife and ruler and start to make your cuts. You will need to make 3 cuts.
The first cut will be from left to right on the first score line, but you only cut through 3 of the squares.
The second cut will be from right to left through 3 of the squares.
And the third cut is left to right again though just 3 of the squares. (see picture to help explain).


Now to fold your pages. Start to accordion fold your pages starting from the top left. When you get to the end of the row fold the top section down and continue to accordion fold. Again at the end of the row fold the top section down. Continue to the end of the paper.


You will now have a neat little folded 3” book!


You can make covers for you book in 2 ways.
First is to take a piece of cardstock measuring 3” x 6 ½”.
Score at 3” and 3 ½” to make a little cover for your book. 


Glue the first and last pages to the covers. If you want to have a ribbon tie to close the book then make sure you add the end of the ribbon under the covers before you stick it all together!


Now you can decorate your little book. Some of the pages in the book can be made into little pockets to hold things such as tags or you can close them with brads, double sided tape, sewing etc.  Have fun and let your creativity guide you!


This shows how I folded over one of the double pages to create a pocket with a little tag inside.


Hope you enjoyed this little tutorial. If you make a make book I would love to see. Feel free to add a link to the comments below or share a picture on our Facebook page.

Happy Crafting,
Maxine x

Tuesday, 10 February 2015

Tutorial Tuesday - Fishtail Cord Bracelet

Welcome to Tutorial Tuesday. This week we are making a fishtail cord bracelet. The great thing about this bracelet is that you can make in any colours you like and to fit any size wrist! They look great if you make up lots of colours and wear them together. 


You will need:
3x 24” lengths of 1mm cord

or
your choice of clasp

Cut your 3 piece of cord to approx 24” (60cm). You can use all the same colour or 2 or 3 different colours.

Fold the cords in half and tape the ends together. Make sure that they cords lie flat and you have 1 of each half on both sides.  (see picture as it makes more sense!).


 It might help clip the cords to something to hold them in place while you plait.

Start to plait your cords by bringing the 2 outer cords into the middle and crossing them over. 


Keep repeating this way by bringing the 2 outer cords into the middle and crossing them.


Make sure you pull them tight together.


Once you get to the desired length trim off the excess cord and attach a ribbon or cord end to both ends.

Add a jump ring and a lobster clasp and you are done!


Hope you enjoyed this little tutorial and if you make a fishtail cord bracelet we would love to see!

Happy Crafting,
Maxine x

Thursday, 29 January 2015

Tutorial Thursday - Easel Card

This week for our first Tutorial Thursday I have a little tutorial on how to make an Easel Card.
The beauty of this card is that you can make it pretty much any size you want and the way you make it stays the same!


Take a piece of card and fold in half. (I used an A4 piece of card cut to 6” wide.)

Fold one side in half again.


Trim your patterned paper/coloured card to the size of the card and add glue to the bottom half of the flap. Stick the paper to the card so that the top part is ‘free’.


 Add paper to the bottom of the card. Decorate the top.

Make up a small panel to go on the bottom of the card and attach with foam pads, this will hold the easel in place. (I made mine 2" wide and positioned it about 3/4" up from the bottom of the card but you can put it wherever feels right to you.)


Add any extra embellishments and you are done!


Simple design to make once you have the hang of it and they look really effective. Just be careful if you are sending the post as due to the foam pads it will probably be larger than just sending a normal card.

Have fun creating some easel cards,
Happy Crafting,
Maxine xx

Thursday, 22 January 2015

Birthday Planner Tutorial

Want to stay organised this year and keep up with all the birthdays you have to buy for? Why not make yourself a Birthday planner that you can keep in your bag and keep a record of presents you have bought and ones you need to get. This planner can also be made into a Christmas planner if you don't need a birthday one or maybe make yourself both!


You will need:
2/3x 12"x12" pieces Cardstock
Printer paper/light card
Patterned Papers (scraps will work too) I used Echo Park Dots & Stripes Candy Shoppe
Bone folder (or something to score lines with)
Brads
Chipboard or Greyboard (optional)

Planner pages (you can download from our website for free here)

1.Take a piece of 12x12 cardstock that you want to use as the base for your planner. You will need to make 4 score lines. 1 line at 3", 1 at 6" and 1 at 9". Then rotate your cardstock 90 degrees and make another score line 4" in from the edge.


2.Now fold the bottom edge of the cardstock on the 4" line into the middle. This will be the pocket.

3. Concertina the card on the other lines. Fold in half at the 6" line (so the pocket section is on the outside) then fold inwards on the other 2 lines.

You will end up with something that looks like this:


4. From another piece of cardstock cut 3 or 4 pieces measuring 2 3/4" x 7 3/4". These will be the inserts for the pockets. In my birthday planner I used the same colour as the base of my planner but in my Christmas one I used another contrasting colour.


5. Now you need to print out the calender, gift ideas, card list etc pages.
You can find the different printable pages here. Choose the ones that you want to use and print them on a light weight card.


6. Trim each element so you are cutting just inside the border lines. This will ensure that they fit onto the card inserts you previously cut. Attach the pages to the card inserts with a brad so that you can swivel the pages. 


7. As an alternative to having a 4th page element you can also create a pocket that you can store lists, receipts etc in. To make this you will need a piece of cardstock measuring 91/4" length x 6" width.  Score a line at 2 1/2" and 5 1/4" (from top to bottom) and another 1 1/2" from the top. Cut off the 2 corner pieces and then fold on all your score lines. 

Put some adhesive on the edge of the large flap and stick on top of the small flap. This will then give you a pocket that is open one end and with a flap at the other end. You can seal the bottom of the pocket by wrapping a piece of decorative paper around the bottom.

8. Now you can decorate your planner.
I kept mine quite simple and just stuck some patterned paper and stickers on the pockets. You don't want to add any bulky embellishments or you will struggle to close the planner!


9. For the covers I covered 2 pieces of 3" x 8" chipboard and stuck them to the cardstock but you could just use some card or patterned paper to decorate the front if you don't want to use chipboard or greyboard.

10. Add some ribbon so you can tie the planner closed (optional) and you are finished!


Here is my Christmas Planner example, you can also find all the pages to create a Christmas planner on the page with the Birthday planner pages here.


I hope that you will find this planner of use and if you make one I would love to see. Feel free to share a picture on our Facebook page or a link to it on your own blog in the comments below.

Happy Crafting,
Maxine

Please note: these instructions, photos and files are copyright of Creative Hobby Supplies 2015.  If you wish to link to this tutorial please feel free, but do not copy this and claim as your own. Thank you!

Monday, 19 January 2015

What's the difference? - Mod Podge, PVA & Decopatch Glue

The other day I was asked the question 'What is the difference between Mod Podge, PVA and Decopatch Glue?'. So this weekend I decided to test them. Now I use all of these glues for different projects and after reading up on it I've realised that it is quite a lot to do with personal preference as to which glue you use, but I thought I would do a little run down of my findings and let you know my opinion in the hope it might help some people choose which glue to use.

I used:
Mini Paper Mache Boxes
Red Decopatch Papers
Matte Mod Podge
Gloss Mod Podge
Decopatch Glossy Glue
PVA Glue

This is what the boxes look like to start:


And this is how they looked once they were covered and dry.


Matte Mod Podge


This was the first time I had tried the Matte Mod Podge and I am very impressed with the outcome. It has a definite matte finish and looks completely different from the other 3. If you are after a smooth non shiny finish then this is the one to use.


Gloss Mod Podge


I have used gloss Mod Podge quite a few times before but I normally use it when glittering items (such as glasses) and haven't used it for decopatching before. I found that it is a very similar finish to the Decopatch glue. It is glossy and shiny but I can see the brush strokes, although this could have been down to the paintbrush I was using.

I have heard that quite a lot of people are put off of using Mod Podge for this type of project because it can feel tacky to the touch even after it has dried. Now on this box I haven't found that at all but I have in the past use it to coat some paper beads I made and after several coats I have found that they do seem to have stayed tacky, so it could be how thick you layer the glue. This is where the personal preference comes into it, depending what project you are doing.

Decopatch Glossy Glue


This is the glue that I normally use for this sort of project. I have decopatched a small paper mache horse, some shelving and some Christmas decorations and have always used this glue. Now after doing this I see very little difference to the gloss Mod Podge. It is glossy and shiny but again I can see the brush strokes. Decopatch glue is slightly runnier than Mod Podge but is non toxic and has less of an odour so is better for using with children. The one difference I can feel is that it seems to be a harder coating but this could be down to the different shapes of the boxes. I will probably continue to use Decopatch glue for this type of project because of the potential for the Mod Podge to stay tacky if you use too thick a coating.

PVA Glue 


I normally use neat PVA for sticking down embellishments and papers and I use it a lot when making mini books to ensure that my papers are well stuck to my covers. For this project I used it watered down as it was too thick to use straight from the bottle for decopatching. Again how much you water it down comes down to personal preference but I have seen the ratio of 2/3 glue to 1/3 water. This box is not as glossy and shiny as the Decopatch and Mod Podge but not as matte as the matte Mod Podge. Again some people find that PVA can stay tacky depending how much you have used. On this box I found that the lid was not always easy to remove but this could be due to the shape. If you are looking for a cheap alternative to the other glues then this would suffice but just isn't quite so glossy.

I have seen people suggesting that if you add a few drops of a water based varnish to the water/glue mixture that it makes it more glossy and like Mod Podge, this is maybe something to experiment with.

Conclusion
My final conclusion is that there is not a massive difference between them (except the Matte Mod Podge!) and if one works for you then there isn't really a need for you to purchase another. But if you are like me then you have your preferences for each glue for different projects. I will still continue to use the Decopatch glue for decopatching (or the Matte Mod Podge if I want a matte finish), the PVA for mini books and the Mod Podge for glittering things. But if I ran out of Decopatch glue and had the urge to decopatch something then I know I could still use Gloss Mod Podge or PVA as an alternative.

I hope that this has given you some idea as to the differences between the glues and what you might use them for in the future.

Happy Crafting,
Maxine x

Tuesday, 9 December 2014

Christmas Planner Tutorial & Printables!

Welcome to our Free mini tutorial on making a re-usable Christmas Planner! With Christmas so close it may be great to get you organised or maybe something you can create as presents or for yourself for next year! (This was a tutorial I wrote a few years ago, so you will notice some of the dates on my photos are out!)

For this project you will need:

- 2x 6"x6" pieces of Chipboard (we have these precut and pre punched chipboard covers you could use but note they are only 5.75" square so slightly smaller than my example and you will need to adjust the sizes of the pages slightly from my suggestions below).
- 2x 1" book rings (you can also use 2" depending on how big you expect your planner to get!)
- Christmas Papers
- 1 sheet of 12"x12" Acetate (or several smaller pieces!)
- Letter Stickers (I used mostly ones that came in my collection kit)
- Plain white Card
- Printer
- Hole Punch (I used my cropadile)
- Optional Ribbon & Embellishments

Here is my example created using left overs from my last years Christmas paper collection. You can use any Christmas papers you may have in your collection (my papers were Echo Park) or we have a whole Christmas section in the shop here.


Step 1: Cover your Chipboard with your chosen papers (I was using part sheets so my front and back covers are different!).

Step 2: Trim your acetate down to size. You need at least 4 6"x5 1/2" pieces. I had printed acetate so used this. You can use plain acetate or create your own pattern acetate by stamping Christmas images onto it using acrylic paints. Your pages will be 6" high and 5 1/2" wide.

Step 3: Create tabs for each of your acetate pages by cutting a small piece of paper to approx 1 1/2" x 1 1/2". Fold in half and round the corners. Then attach to either side of your acetate piece. Repeat for each page but line up your tabs one below the other.


Step 4: Now punch your holes in the covers and acetate pages. I punched mine at 1 3/4 " from the top and bottom and 1/2" in from the side.

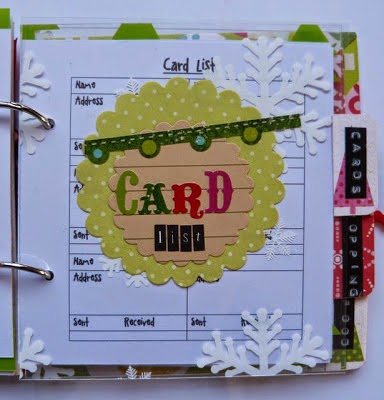
Step 5: Now you can decorate your acetate pages. I kept mine simple and just made a title block for the middle of each page. You will need a 'Gift List', 'Card List', 'Menu' and 'Shopping List' title. Also add a word to each of your side tabs so that you can easily jump to a section of your planner.


Step 6: Create or buy a small envelope. Mine measures 5" x 5". Punch holes so that the envelope is central in the book and add a 'Receipts' title block to it.


Step 7: Now you can print your inserts. I would recommend printing on some light card (I have used a plain white cardstock pack from Wilkinson!).

The following printables are PDFs and are sized to fit this album.

Click hereto go to the website and print the FREE printables!

Step 8: Trim down your printed elemants so that you have 1/2" on the right hand side of each table and 7/8" on the left hand side. This will ensure that your pages will fit perfectly behind each acetate page divider. (also make sure the height of each page is no more than 6"!) You only need 1 each of the calendar pages but you can print off as many of each of the others as you need.

Step 9: Now add your pages to your album using your book rings. You can choose the order you want your pages to go but for an idea mine is:

Calendar Pages
To Do List
Gift List Acetate divider
Gift list Pages
Card List Acetete divider
Card List Pages
Shopping List Acetate Divider
Shopping List Pages
Menu Divider
Menu Pages
Receipt Envelope


Step 10: Finally decorate the front of your planner. I simply took some card and layered it up with a snowman sticker and some alphas. I stuck this down with a piece of ribbon threaded through the middle so that I can tie my book closed and added some ribbons to my book rings.

By using acetate as your divider pages this will make your planner more durable as you will be likely to be turning pages quite a lot, if you used paper/card they would be more likely to rip.

Using book rings ensures that you will be able to put in more pages as you need them and for future years all you need to do is print more of the pages and you can use the planner all over again!

I really hope that you have enjoyed this tutorial and that the planner and our printables are of use to you. If you make a planner we would love to see, feel free to share on our Facebook page or leave a link in a comment here.

Maybe this planner is not your style? Then watch out for later in the week when we will be having another mini tutorial on a different re-usable style planner with no need for hole punches, chipboard or book rings!!

Until then, happy crafting,
Maxine

Please note: this tutorial and printables has been created by me (originally for Truly Madly Crafty, now for Creative Hobby Supplies) for your personal use only. Please DO NOT copy or reproduce this tutorial without prior permission. But please do feel free to link to this tutorial from your blog or social media if you think other people will find it of use. Thanks!