Tuesday 31 March 2015

Tutorial Tuesday - Easter Crafts

For this weeks tutorial Tuesday instead of doing a tutorial myself I have compiled a list of 10 fun projects/tutorials that you (and the kids) can do over the Easter holidays from other fabulous bloggers. I hope you like them as much as I do!

Supplies:
Polystyrene Easter Eggs can be found here.
Mod Podge can be found here.
Decopatch Papers here.
Tissue Paper here.
Buttons here.
Glitter here.
Felt here.
Washi Tape here.
Easter themed supplies here.


  1. Cute Button Egg


  1. Easter Marshmallow Bark
This just looks yummy!


  1. Salt Dough Egg Ornaments


Find a simple recipe for salt dough here.

  1. Yarn Eggs
Fill these with small chocolates or little gifts and use pastel coloured yarns to make cute Easter gifts.


  1. Tissue Paper Eggs
You could also use Decopatch papers.


  1. Glitter Eggs
If you don’t have plastic eggs you can always use a hard boiled or blown-out egg.


  1. Paper Eggs


  1. Felt Shapes
Use felt and fill with fibrefill or cotton wool to make cute Easter hanging decorations.


  1. Washi Tape Art
This could also be done with strips of paper and instead of using the negative space you could place the strips onto a piece of paper and then cut out an egg shape and add to cards, make tags etc.


  1. Simple Easter Paper Baskets


I hope you like this selection of Easter crafts that I have put together for you and hope that you have fun with some of them over the holidays.
Have a Happy Easter,
Maxine 


Tuesday 24 March 2015

Tutorial Tuesday - Memory Wire Bracelets

Happy Tuesday. This week I am showing you how to use memory wire to make a bracelet. 

You will need:
Memory Wire coils
Beads
Memory wire cutters/heavy-duty cutters
Round nosed pliers


Memory wire is a steel spring wire. It retains its curved shape so all you have to do is thread on your beads and secure the ends. It is a very hard wire so requires Memory wire cutters or any heavy-duty cutters, your normal jewellery wire cutters will not be strong enough and will get damaged if you try to use them!
The wire expands to fit the wrist, so bracelets made with it have a "one size fits all" quality.

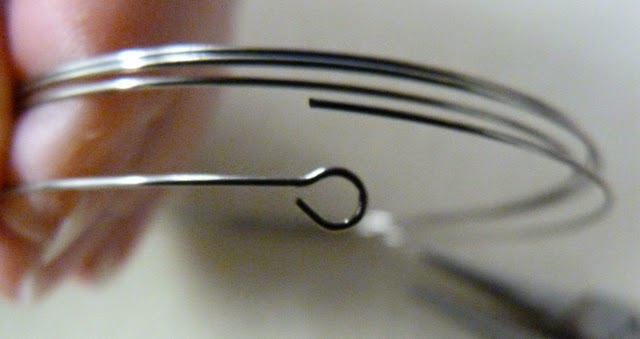
1.      Bend a loop in one end. Start by bending about 1/2 inch at one end to 90 degrees. Memory wire is very stiff and hard; so don't be afraid to use some muscle!


2.      Position the round nose pliers at the end of the wire, and roll the wire into the start of a loop. Reposition the round nose pliers down at the bottom of the loop and continue to curl the wire around into a full loop.


Continue to tighten the loop until you have a full loop that will stop beads from sliding off.

3.      Start threading on your beads!

4.      Make sure you slide all the beads to the end and there are no gaps. Use your cutters to cut down the wire to the correct size. Bend a loop in the end, same as you did in the beginning. You may need to adjust the size of the loop to get the tension right.

5. Congratulations you have now finished your bracelet!


Pictures and text copyright of ©Creative Hobby Supplies. Please do not copy and reproduce without prior permission. Feel free to link to our tutorial or reproduce in your own words and pictures.  Thanks!

Happy Crafting,
Maxine xx

Tuesday 17 March 2015

Tutorial Tuesday - Tabbed Concertina Mini Book

This week we are making a tabbed concertina mini book. This little book is great for listing your top favourites of something or capturing little snippets of an event or occasion.

You will need:
- Chipboard or Greyboard
- 12x12” Patterned Papers/Cardstock (you will need 3 sheets, I used My Mind’s Eye Lost and Found Two Papers)
- PVA Glue (or other wet glue)
- Score board and bone folder (optional)
- Ribbon (optional)


1. Cut 2 pieces of board for the covers measuring 41/2” x 61/2”.

2. Cover with your chosen patterned paper using a wet glue.

Check out our pocket mini book tutorial here if you would like details on how to neatly cover chipboard for mini book covers.


3. If you want to add a ribbon closure make sure you do this now! That way you can add the ribbon to the inside and then cover with a piece of paper to finish off the inside. I forgot to do this and had to stick the ribbon to the inside covers and then cover with another little piece of scrap paper to hide the end of the ribbon!


4. Cut another piece of patterned paper or cardstock to 6” x 12”.

5. Mark the following measurements on the paper or use your score board and score at: 2” in from one edge, then at 3”, 4”, 5”, 8”, 7”, 8”, 9” and 10”.

6. Make concertina folds on these lines.

7. This will give you the spine of the mini book.


8. Put double-sided tape on 3 edges of the ends of the concertina spine. Attach this to the front and back covers so that you create a pocket for adding in extra photos, journalling etc.


9. Cut 12 pieces of patterned paper measuring 3 1/2” x 1 3/4”. These will be your tabs that you stick onto the concertina spine. Alternatively if you wanted full pages you could cut 4 pages measuring 6” x 4”.

10. Start to stick the pages onto the spine as follows:

 Stick the first 2 tabs onto the front of the first concertina fold at the top and the bottom.


Stick the 3rd tab on the back of the first concertina fold in the middle.


Stick the 4th and 5th tabs onto the front of the second concertina fold, again at the top and bottom.


Stick the 6th tab onto the back of the second concertina fold in the middle.


Continue adding the next 6 tabs to the last 2 concertina folds in the same way.


11. Cut 2 pieces of paper/card to fit into the pockets on the front and back covers.


12. You can now have fun decorating and embellishing your mini book!


I hope you have enjoyed this tutorial and making this little book. If you make one we would love to see. Feel free to share any links below or put pictures directly on our Facebook page.

Happy Crafting,
Maxine x

Tuesday 10 March 2015

Tutorial Tuesday - Square Knot Bracelet (Macramé)

This week we are looking at the square knot bracelet or macramé as it is known. This bracelet can be made in any colours that you can get the cord in and you can use beads or just cord. There are several ways that you can fasten your bracelet when using this technique, here I show you how to simply use a toggle clasp.
Macramé is a form of textile-making using knotting rather than weaving or knitting. Its primary knots are the square knot. This same technique can be used to create simple bracelets from cord and ribbon.
For this project you will need:
-         Cord (approx 2.5 metres)
-         Beads (5+) Make sure the hole is big enough to take 2 cords.
-         Toggle clasp
-         Jewellery glue
-         2 Clips
-         Sturdy Board

  1. Start by Cutting your cord into 2 pieces. 1 to measure approx 50cm/20” which will be your base cord (this wants to be just over the length you want your final bracelet to be, doubled. The bracelet I’ve made is approx 71/2” long, its better to have more cord than not enough). The 2nd length wants to be around 2 meters long, this will be your working thread. (I have used 2 colours to show the different cords, you would normally use the same colour.)
  1. Start by tying the round toggle clasp loop onto your base cord and putting your working cord through the loop so it’s tied on in the middle. (my base cords are black and working cords are Pink)
Macrame 1
  1. Now clip your toggle clasp to the top of a sturdy board. This makes it easy to work with. Pull your base cords down into the middle and your working cords out to either side. Clip the base cords at the bottom as well to hold in place.
Macrame 2
  1. Start with the right side cord. Loop it round and over the base cords so that it looks like a D shape.
Macrame 3 
  1. Now take the cord on the left side and lay it over the end of the right cord.
Macrame 4 
Then take it underneath the middle base cords and then up through the middle of the D. Now pull both cord ends tight. You have now completed a half square knot. 
Macrame 5 
 Macrame 6
Macrame 7 
  1. Now take the cord on the left and loop it over the base cords so it looks like a backwards D. Take the right cord and lay it over the left cord and under the middle base cords, then pull up through the middle of the D. Now pull both cord ends tight. You have now completed 1 full square knot.
Macrame 7 
  1. Keep repeating steps 4 – 6 all the way along if you do not wish to add beads. If you want to add beads then when you have done a few knots and are ready for your first bead, string it onto your 2 base cords and push all the way to the top. Carry on knotting your cords as normal looping your cords around the bead.
Macrame 8
  1. When you get towards the end of your cord, tie the other end of the toggle clasp to the 2 middle base cords and do a simple knot in your 2 working cords. Add some glue to each knot and allow to dry. Once dry trim your excess cords.
Macrame 10


Hope you have enjoyed this little tutorial. If you wish to tie your bracelets in other ways then you can find lots of other tutorials online. If you make any bracelets from this tutorial I would love to see, feel free to leave links below or on our facebook page.

Happy Carfting,
Maxine x

Tuesday 3 March 2015

Tuesday Tutorial - Kusudama Flowers

Welcome to Tutorial Tuesday. This week we are making some more beautiful flowers but these are 3D ones compared to last weeks flat ones. You can make these in a whole range of sizes. The method remains the same for any size you just adjust the size of your original starting square. I'm not always best as explaining things in writing but hopefully the pictures will help clarify anything!


So lets get started!

You will need:
5 squares of paper/card per flower (mine measured 3"x3")
Wet glue (I used Glossy Accents but you can use any you prefer)
Bone folder (optional but helps with your creasing)

1. Cut your paper into squares. You will need 5 squares per flower.


2. Fold your squares in half to form a triangle.


3. Fold the left and right corners into the middle to form a square.


4. Fold the corners down so that the middle edges line up with the outside edges of the square.


5. Open up the 'flaps' and flatten them.


6. Fold the top triangles down so they are level with the edges of the paper.


7. Fold the triangles back in half along the crease you made earlier.


8. Glue the 2 outside triangles together to form your petal.


9. Repeat for all squares of paper.


10. Glue each petal to the next. Run a thin line of glue along the edge of each petal to stick together.


11. Your flower is finished!


12. If you want to make a Kusudama ball then you will need 12 flowers, you can then glue them together to make the ball.

In my example above I have put my flowers onto pipe cleaners which I find fit into the hole in the middle perfectly. I have then displayed them in a bottle/vase.

Hope you enjoyed this flower tutorial. If you make some flowers we would love to see. Feel free to share some pics as a link below or on our Facebook page.

Happy Crafting,
Maxine xx