Welcome to another Creative Hobby Supplies Tutorial. Today I will be showing you how to create a Pocket Mini Book.
This is what we will be creating:
To complete this project
you will need:
-
Chipboard
- Book Rings/Binding
- Embellishments to decorate and ink (optional)
- Cut your chipboard so you have 2 pieces
measuring 5 ¾” x 4” for your front and back covers.
- Select your Cardstock/Patterned paper you want
to use for your front covers – cut 2 pieces to 6 ¾” x 5”. This will give
you ½” extra around all the sides.
- Using a wet glue apply to the chipboard and
stick to the cardstock.
- Using a ruler or off cut of chipboard place on
each corner of the chipboard and draw a diagonal line. Then trim off this
triangle of card. Repeat for both pieces.
- Using a bone folder score along each side of
the chipboard and fold up the 2 longest sides.
Add
a small amount of glue to the flap and fold over and stick to the chipboard.
You may have to keep running your bone folder over the flap to ensure it
sticks.
- Using your bone folder tuck in the very
corners of the card on all 4 corners. This will ensure you get a nice
finish to your corners. (to see a great video tutorial on how to do this
search for 'Make the Grade book' on Google videos.) Fold up the 2 shorter sides.
Add a small amount of glue and stick to the chipboard as before.
- Repeat for the other chipboard cover.
- Now choose your inside cover paper and cut 2
pieces to 5 ½” x 3 ½”. Stick to the chipboard covers with double sided
tape and set aside.
- Cut out your envelope/pocket template.
- Trace around the template onto the reverse of
your paper and cut out.
- Score along the lines shown on the template
and fold.
- Using double sided tape sick the flaps so that
the small side flap is under the large flap and the bottom flap is on the
top. Make sure you don’t cover the entire small flap as the larger one
doesn’t cover it all – check before applying glue!
- Now repeat for all your patterned paper
depending on how many pockets you want.
I created 5 pockets using 2 pieces of paper and the left over from
covering the inside of the covers. You should be able to get 2 pockets
from each sheet of 12x12 paper.
- Now using a punch or drawing and cutting out,
cut a ½ circle in the top of each pocket on the front. I used a 1 ½”
circle punch.
If you wish to add in extra pages, maybe just simple cardstock pages then cut them out now to the same size as the pockets.
- Now choose how you are going to bind your
book. You can simply punch 2
holes in the covers and pockets and attach some book rings or you can use a Binding Machine if you have access to one.
Your
book should now look as below.
- Now to make the inserts. Cut some cardstock
and patterned paper to 3 ½” x
5”. You should be able to use your left over card from your front cover
and from when cutting the pockets. Cut some small pieces in different
shapes and ink the edges and stick to the larger pieces. You can use these
inserts as photo and journaling mats or you could attach paper to the back
of them with a brad and use as a mini journaling book.
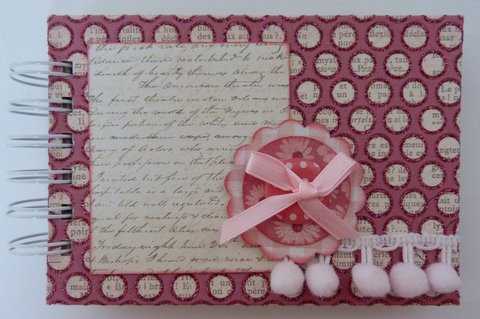
- Finally you can start decorating your front
cover in any way you wish. For mine I cut one of the few remaining left
over pieces of paper to 2
¾” x 3 ¼”, inked and stuck on the left of the book. I then punched a
flower shape and again inked. I tied some ribbon through a large button
and stuck onto the punched shape above some of the pom pom ribbon. Now you
can add your title and add all your photos and journaling to your little
book.
I have created several of these little books in a range of different papers, they can get quite addictive:
I hope that you have enjoyed this totorial and if you create a little book from it I would love to see, please leave a link below in the comments and I will stop by and take a peek :)
For now Happy Crafting,
Maxine
Instructions © Maxine for Creative Hobby Supplies, Please do not reproduce without prior permission. 2013