
This week we are looking at making your own embellishments. These are great for all sorts of things including to match scrapbook layouts, card and tag toppers and even toppers for presents.
The idea is to just use what you have on hand. Small scraps of paper that you can punch out work well. Keep yourself a box just for your scraps and you will always have a selection of colours on hand to use for these types of projects.
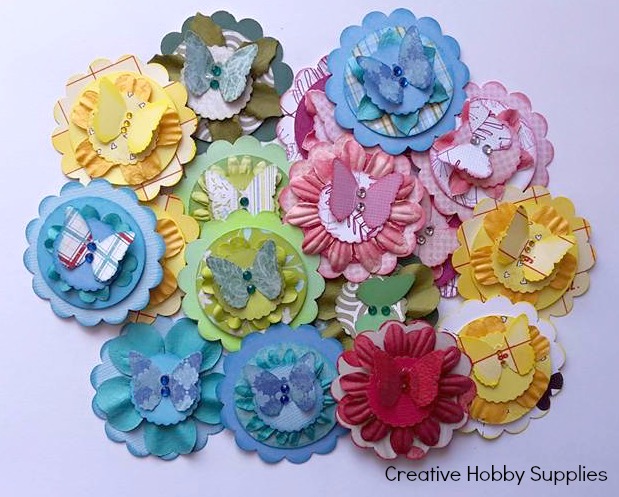
Here are a selection of butterfly ones I have created. You don't have to make them with butterflies like I have, there are a few other options I have included below. What punches do you own?

You will need:
Various punches or dies
Paper and card to match your project (scraps work well)
Double sided tape and foam tape
Glitter, gems, buttons, flowers, brads, ribbon etc of your choice.

Start by punching out and gathering the shapes that you want to use. For my butterfly ones I used a large scalloped circle punch, a circle punch and a small scalloped circle punch, a paper flower and a butterfly punch. Ink the edges if desired before assembling.

Decide the order you want to assemble them in and add double sided tape or foam dots to the back. I use tape on the flowers and foam dots on the other layers and a liquid glue for my butterfly.

Here is how it looks all assembled. The more foam tape and layers you use the more dimensional your embellishments will be.

Don't have that many punches or want to vary the designs a bit? Use brads, buttons and stickers to change up the designs. Have fun and create your embellishments to match your projects.

Here are some simple ones I created a few years ago with book papers, flowers and buttons.

I hope you have enjoyed this little DIY embellishment tutorial and I would love to see if you create any of your own from these ideas. Feel free to share pics on our Facebook page and leave links here.
Happy Crafting,
Maxine
Khelraja offers a wide variety of slot games that suit both beginners and experienced players. From colorful themes to rewarding bonus rounds, these games provide nonstop entertainment. With secure gameplay, real money rewards, and attractive offers, Khelraja stands out as a trusted online betting website for slot fans.
ReplyDelete