Showing posts with label scrapbooking. Show all posts

Tuesday, 14 April 2015

Tutorial Tuesday - Hand Stitching on Papercraft Projects

I am a huge fan of hand stitching on projects. And when I looked through my scrapbook layouts to find some examples of this I was amazed at just how many of my layouts do feature sewing in one way or another! I will show you different examples of how I have stitched on scrapbook layouts but most of these can also be transferred onto cards or other papercraft projects too.

When getting ready to do some hand stitching it’s best to have a surface to rest on, such as a cork-board, piece of foam etc so that you can pre-punch your sewing holes.  There are special paper piercing tools available on the market but I have found that it is easy enough just using regular notice board pins! There are also lots of different types of stitching templates on the market but you can also make your own or use regular household items.

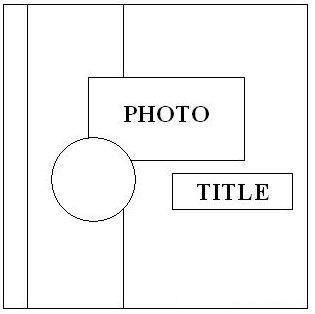
Lets start with a very simple design – simply stitching a boarder around the page, simple but effective.

Here I have just used a regular running stitch. This design can simply be achieved by drawing a faint line around the page where you want your boarder to be and putting a hole at certain measurements. You can then do a simple running or backstitch to create a border.

You can also use a boarder stitch for creating different shapes on your layouts.
For this layout I used a dinner plate to draw round and then pierced my holes as evenly as I could by eye and then used a backstitch.


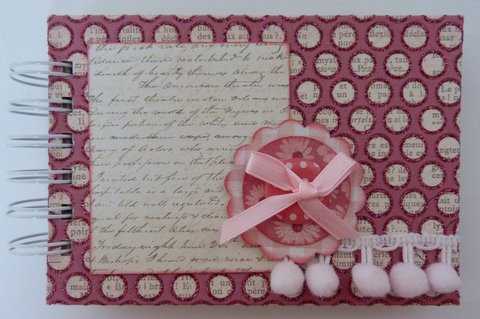
Of course an even simpler type of stitching is the button! I don’t very often glue buttons onto my layouts, I normally stitch them on, ok it may take a bit more time but I much prefer the look.

This layout below took a very long time to sew but I love the result.


To create this I drew a heart on some card the size and shape that I needed it and then cut it out. I stuck down my photo where I wanted it then placed the heart template on the top and lightly drew around it. Then I arranged the buttons around the shape where I wanted them and pierced all the holes. I then had to remove all the buttons so that I could sew each one on individually, so I took a quick photo so that I could refer back to it and see where I had put the different buttons. However it would probably be easier if you just stuck each button down and then sewed them on, as this would save you time!

Of course you don’t have to use quite so many buttons on a layout to get an equally stunning effect! You will probably notice other buttons in more of my layouts.

Next we have simple cross stitches This is easily achieved by drawing some faint lines and piercing the holes like before.


Another simple thing that can be done is to stitch through plain ribbon to give it more of a pattern and make more of a feature of it. Here I have used a simple running stitch and cross-stitches though the centre of the ribbon.


Something else that I often do with ribbon is to create a ruche/ruffled effect by stitching the ribbon in place. I can see that some people may not like this because in some cases you can see the stitching but if you use a colour that matches the ribbon well enough you don’t notice. It doesn’t bother me though as I like the effect once finished.


For something a bit more unusual you can also have a go at stitching fabric onto your layouts as I have done here. I used a simple running stitch and it creates a unique layout.


Or how about cutting our fabric letters and using different stitches to give them more texture and interest.


Now we move onto templates.

You can get stitching templates from companies such as We Are Memory Keepers, however you can also create your own. I use a piece of acetate and either draw, print or stamp a design onto it. You can layer this over the top of your layout and as it is clear you can see where you are going to be piercing. Then pierce your holes evenly along the image to create a custom stitching template! As acetate is quite strong you can keep your template to use again and again (as long as you have used a permanent ink!)! You will probably notice that many of my flourishes below are the same ones just in different colours!


Another thing I love when stitching is to bring the design over onto the photo or over several layers of paper as this seems to integrate the design into the layout more and connect different elements. Also though when using very large flourishes they can work very effectively when taken from the centre out to the edges of the paper.


 And don’t just stop at using one colour! Why not alternate every other stitch with a different colour or wind 2 different colours together. I find embroidery floss is the best to use as you can decide how thick you want your stitching to be. Also you can incorporate buttons into your stitches as I have done or add gems and pearls. You could create your title using a backstitch, or why not use a stamped image and pick our certain bits with stitching? There are so many possibilities!


I hope you have enjoyed this little tutorial and it has given you some inspiration. Why not share your favourite hand stitched paper projects with us?

Happy Crafting,
Maxine xx

Tuesday, 4 June 2013

Pocket Mini Book Tutorial

Welcome to another Creative Hobby Supplies Tutorial. Today I will be showing you how to create a Pocket Mini Book.

This is what we will be creating:


To complete this project you will need:
-         Chipboard
-         Envelope/pocket template (click to view and download)
-         4x 12”x12” Cardstock/Patterned Papers (double sided)
-         Wet glue e.g. PVA
-         Double Sided tape
-    Book Rings/Binding
-    Embellishments to decorate and ink (optional)


  1. Cut your chipboard so you have 2 pieces measuring 5 ¾” x 4” for your front and back covers.
  2. Select your Cardstock/Patterned paper you want to use for your front covers – cut 2 pieces to 6 ¾” x 5”. This will give you ½” extra around all the sides.

  1. Using a wet glue apply to the chipboard and stick to the cardstock.
  2. Using a ruler or off cut of chipboard place on each corner of the chipboard and draw a diagonal line. Then trim off this triangle of card. Repeat for both pieces.


  1. Using a bone folder score along each side of the chipboard and fold up the 2 longest sides.
Add a small amount of glue to the flap and fold over and stick to the chipboard. You may have to keep running your bone folder over the flap to ensure it sticks.


  1. Using your bone folder tuck in the very corners of the card on all 4 corners. This will ensure you get a nice finish to your corners. (to see a great video tutorial on how to do this search for 'Make the Grade book' on Google videos.) Fold up the 2 shorter sides. Add a small amount of glue and stick to the chipboard as before.
  2. Repeat for the other chipboard cover.
  3. Now choose your inside cover paper and cut 2 pieces to 5 ½” x 3 ½”. Stick to the chipboard covers with double sided tape and set aside.


  1. Cut out your envelope/pocket template.
  2. Trace around the template onto the reverse of your paper and cut out.


  1. Score along the lines shown on the template and fold.


  1. Using double sided tape sick the flaps so that the small side flap is under the large flap and the bottom flap is on the top. Make sure you don’t cover the entire small flap as the larger one doesn’t cover it all – check before applying glue!


  1. Now repeat for all your patterned paper depending on how many pockets you want.  I created 5 pockets using 2 pieces of paper and the left over from covering the inside of the covers. You should be able to get 2 pockets from each sheet of 12x12 paper.


  1. Now using a punch or drawing and cutting out, cut a ½ circle in the top of each pocket on the front. I used a 1 ½” circle punch.

If you wish to add in extra pages, maybe just simple cardstock pages then cut them out now to the same size as the pockets.

  1. Now choose how you are going to bind your book. You can simply punch 2 holes in the covers and pockets and attach some book rings or you can use a Binding Machine if you have access to one.
Your book should now look as below.


  1. Now to make the inserts. Cut some cardstock and patterned paper to 3 ½” x 5”. You should be able to use your left over card from your front cover and from when cutting the pockets. Cut some small pieces in different shapes and ink the edges and stick to the larger pieces. You can use these inserts as photo and journaling mats or you could attach paper to the back of them with a brad and use as a mini journaling book.


  1. Finally you can start decorating your front cover in any way you wish. For mine I cut one of the few remaining left over pieces of paper to 2 ¾” x 3 ¼”, inked and stuck on the left of the book. I then punched a flower shape and again inked. I tied some ribbon through a large button and stuck onto the punched shape above some of the pom pom ribbon. Now you can add your title and add all your photos and journaling to your little book.
I have created several of these little books in a range of different papers, they can get quite addictive:


I hope that you have enjoyed this totorial and if you create a little book from it I would love to see, please leave a link below in the comments and I will stop by and take a peek :)

For now Happy Crafting,
Maxine

Instructions © Maxine for Creative Hobby Supplies, Please do not reproduce without prior permission. 2013

Saturday, 4 May 2013

Scrapbook Inspiration - Sketches 2

I hope that you enjoyed our last post with the 3 sketch examples, today I have 3 more for you to enjoy :)

Sketch #4


Layout Example


 Card Example 

For this card I rotated the sketch by 90 degrees, putting the 'title' at the bottom and 'photos' at the top.  When it comes to sketches you don't have to follow them exactly, they are just as inspiration to kick start your creativity, so swap things around, rotate them and have fun!


Sketch #5


Layout Example 


I have adapted this sketch to work for a 6"x12" layout, but it would work just as well for an 8"x8", 81/2"x11" or a 12"x12". As I said on the last sketch, feel free to adapt each sketch to work for you!

Card Example


Sketch #6


Layout Example


I hope that you have enjoyed this mini 2 part scrapbook inspiration. Why not follow our blog so you don't miss any new posts. Any check out the last 2 links I have for you for more sketch inspiration:


Happy Scrapping ~ Maxine x 


Thursday, 2 May 2013

Scrapbook Inspiration - Sketches

Welcome to May! I cannot believe how fast April went but at least we can now look forward to (fingers crossed) lots of nice sunny weather, assuming this being England, that it plays fair this year!

I hope you enjoyed our last 2 tutorials, today we are looking into scrapbooking sketch inspiration. I will be sharing a few sketches I have created and some scrapbook pages and cards created from the sketch and then some links to great sketch inspiration sites/blogs.

Sketch #1 


The photo area can be 1 6x4 photo or several smaller ones. The block on the left hand side can be made up of a strip of patterned paper, several strips of co-ordinating papers or ribbons. Underneath the title there is space for journaling should you wish to include some. And the circle on the corner of the photo is a cluster or embellishments/flowers/buttons etc. 


Layout example 1 


Layout example 2 


Card example 


Sketch #2 


I love the versatility of this sketch, you can fit up to 9 photos on it should you wish (as in layout example 3) or include 6 photos and use the bottom (or top) section for your title and journaling (as in examples 1 and 2). In my layout examples my coloured squares measure 3" and my photos approx 2", but you could make each square a 3" photo if you do not wish to include a photo mat. You could also use some of the squares for journaling instead of photos. I love to embellish my layouts quite a lot but you could also make a much simplier and clean looking layout by using minimal embellishments. The list of options with this sketch is almost endless! 


Layout Example 1 


Layout Example 2


Layout Example 3


Card Example


Sketch #3


Layout Example 1


In my layout example I have merged the journaling and title together but you could have a seperate journaling and title block like the sketch shows. 


Card Example 


Check back at the weekend of a follow up post where we will be sharing another 3 sketches and inspiration.

For now why not check out some of these sites for more great sketches:


Have fun and if you create any layouts or cards from any of our sketches we would love to see, please pop a link below or share with us on our Facebook page :)

Happy Crafting ~ Maxine x