Welcome to our Free mini tutorial on making a re-usable
Christmas Planner! With Christmas so close it may be great to get you organised or maybe something you can create as presents or for yourself for next year! (This was a tutorial I wrote a few years ago, so you will notice some of the dates on my photos are out!)
For this project you will need:
- 2x 6"x6"
pieces of Chipboard (we have
these precut and pre punched chipboard covers you could use but note they are only 5.75" square so slightly smaller than my example and you will need to adjust the sizes of the pages slightly from my suggestions below).
- 2x
1" book rings (you can also use
2"
depending on how big you expect your planner to get!)
-
Christmas Papers
- 1 sheet of 12"x12"
Acetate (or several smaller pieces!)
- Letter
Stickers (I used mostly ones that came in my collection kit)
- Plain white Card
- Printer
- Hole Punch (I used my cropadile)
- Optional Ribbon & Embellishments
Here is my example created using left overs from my last years Christmas paper
collection. You can use any Christmas papers you may have in your collection
(my papers were Echo Park) or we have a whole Christmas section in the shop
here.

Step 1: Cover your Chipboard with your chosen papers (I was using part sheets
so my front and back covers are different!).
Step 2: Trim your acetate down to size. You need at least 4 6"x5 1/2"
pieces. I had printed acetate so used this. You can use plain acetate or create
your own pattern acetate by stamping Christmas images onto it using acrylic
paints. Your pages will be 6" high and 5 1/2" wide.
Step 3: Create tabs for each of your acetate pages by cutting a small piece of
paper to approx 1 1/2" x 1 1/2". Fold in half and round the corners.
Then attach to either side of your acetate piece. Repeat for each page but line
up your tabs one below the other.

Step 4: Now punch your holes in the covers and acetate pages. I punched mine at
1 3/4 " from the top and bottom and 1/2" in from the side.
Step 5: Now you can decorate your acetate pages. I kept mine simple and just
made a title block for the middle of each page. You will need a 'Gift List',
'Card List', 'Menu' and 'Shopping List' title. Also add a word to each of your
side tabs so that you can easily jump to a section of your planner.

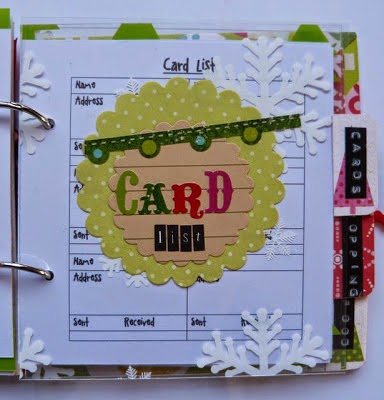


Step 6: Create or buy a small envelope. Mine measures 5" x 5". Punch
holes so that the envelope is central in the book and add a 'Receipts' title block
to it.

Step 7: Now you can print your inserts. I would recommend printing on some
light card (I have used a plain white cardstock pack from Wilkinson!).
The following printables are PDFs and are sized to fit this album.
Click hereto go to the website and print the FREE printables!
Step 8: Trim down your printed elemants so that you have 1/2" on the right
hand side of each table and 7/8" on the left hand side. This will ensure
that your pages will fit perfectly behind each acetate page divider. (also make
sure the height of each page is no more than 6"!) You only need 1 each of
the calendar pages but you can print off as many of each of the others as you
need.
Step 9: Now add your pages to your album using your book rings. You can choose
the order you want your pages to go but for an idea mine is:
Calendar Pages
To Do List
Gift List Acetate divider
Gift list Pages
Card List Acetete divider
Card List Pages
Shopping List Acetate Divider
Shopping List Pages
Menu Divider
Menu Pages
Receipt Envelope

Step 10: Finally decorate the front of your planner. I simply took some card
and layered it up with a snowman sticker and some alphas. I stuck this down
with a piece of ribbon threaded through the middle so that I can tie my book
closed and added some ribbons to my book rings.
By using acetate as your divider pages this will make your planner more durable
as you will be likely to be turning pages quite a lot, if you used paper/card
they would be more likely to rip.
Using book rings ensures that you will be able to put in more pages as you need
them and for future years all you need to do is print more of the pages and you
can use the planner all over again!
I really hope that you have enjoyed this tutorial and that the planner and
our printables are of use to you. If you make a planner we would love to see,
feel free to share on our Facebook page or leave a link in a comment here.
Maybe this planner is not your style? Then watch out for later in the week when we
will be having another mini tutorial on a different re-usable style planner
with no need for hole punches, chipboard or book rings!!
Until then, happy crafting,
Maxine
Please note: this tutorial and printables has been created by me (originally for Truly Madly Crafty, now for Creative Hobby Supplies) for your personal use only. Please DO NOT copy or reproduce this tutorial without prior permission. But please do feel free to link to this tutorial from your blog or social media if you think other people will find it of use. Thanks!


